Instructions
Create Project
- To create a new project, click Manage Projects, then the “Create Project” button.
- Here you can enter the project name, location and any notes you want to include.
- Click “Save” and your new project will appear at the top of the list.
Manage Projects
- You can sort projects by name, date created, location or even number of zones.
-
To the right of each project are the project management functions
- Edit - Allows you to edit the name, location and/or notes.
- Delete - Will permanently delete your project.
- Manage Zones - This is where you can create, edit and manage all of the zones within your project.
- View Project - Here you can view all the information you have entered about your project.
Create and Manage Zones
-
From the Manage Projects page, click the Manage Zones button.
- a. If this an existing project, the zones that have been created will be listed here.
- b. If this is a new project, there will be no zones listed and new zones will need to be created.
- To create a new zone, click the “Create Zone” button.
-
You will be prompted to give the zone a name
-
a. Zone Names could be anything that distinguishes this zone from another:
- i. Classroom 123
- ii. Gymnasium A
- iii. Conference Room 4
- iv. Museum - 1st Floor
-
a. Zone Names could be anything that distinguishes this zone from another:
- Click Save and your new zone will appear on the Manage Zones list.
- The zones can be sorted by Name or Date Created.
- Click Edit to be brought to the calculator
- Click Delete to permanently remove the zone from the list
- Once you have performed the calculation and generated a PDF for the zone, a View PDF button will be available.
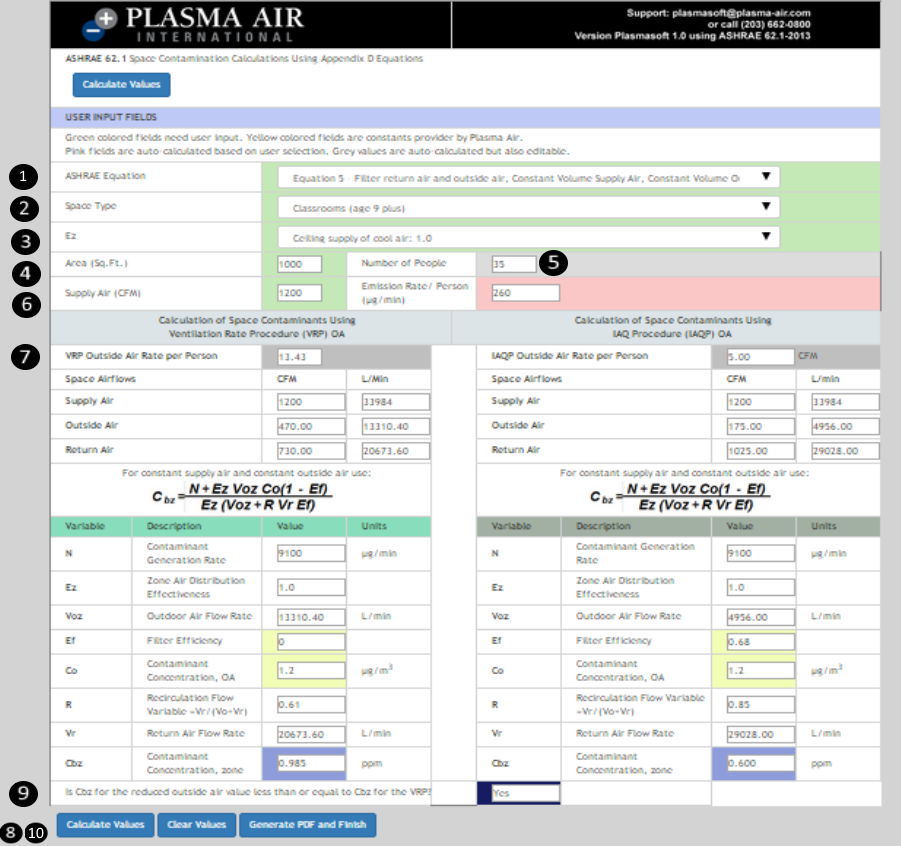
Using the Calculator
Step 1: Choose an equation from the drop down menu.
If you are unsure about which equation to choose, click FAQ to learn more.
Step 2: Choose a Space Type from the second drop down menu.
Step 3: Choose the Zone Air Distribution Effectiveness, Ez, from the third drop down menu.
Step 4: Input the zone Area in square feet (Sq. Ft.)
Step 5: The ASHRAE maximum recommended number of people in each zone is automatically calculated. You may override this number.
Step 6: Input the zone’s Supply Air (CFM)
Step 7: For the Ventilation Rate Procedure, the Outside Air Rate Per Person is calculated. To learn more about where the equations come from click FAQ. For the IAQ Procedure, the Outside Air Rate Per Person is calculated using Plasma Air's algorithm. This can be overwritten. To learn more about the algorithm, click FAQ.
Step 8: Click Calculate
Step 9: Check the results - Check to make sure Cbz for the IAQ Procedure is less than Cbz for the Ventilation Rate Procedure. If this is not the case, click FAQ.
Step 10: Generate a PDF - Once you generate a PDF, you will be brought to the Manage Zones page. Here you can view the PDF or start a new zone.